
A deep understanding of a vehicle’s suspension system is crucial for unlocking its full potential. Therefore, professional testing equipment is necessary for achieving precision tuning and optimal handling. Learn about our shock dyno models.
Whether you’re a seasoned mechanic, a motorsports enthusiast, or a curious DIYer, learning how to use the dyno to the fullest extent can elevate your vehicle’s suspension dynamics to new heights.
With this in mind, we have compiled a comprehensive guide wherewe will walk you through how to use a LABA7 damper tester. You will also learn how this equipment works and what are the main benefits it provides you with.
Table of Contents:
- How-Does-the-Testing-Equipment-Work?
- Different Models of LABA7 Damper Testers
- Step-by-Step Guide to Using the Machine
- Equipment Calibration Process
- Is it Worth Investing in Suspension Diagnostic Equipment?
How Does the Testing Equipment Work?
A damper test bench is a specialized tool used to evaluate and analyze the performance characteristics of shock absorbers. Its primary function is to simulate the conditions these components experience during actual use, providing valuable data for fine-tuning and optimizing vehicle suspension systems.
There are four types of damper testing equipment overall, including Scotch-Yoke, Crank-Based, Electromagnetic Actuator, and Hydraulic.
The majority of dynos are equipped with data acquisition systems that collect accurate data points at high, low, or several types of frequencies simultaneously, allowing for a detailed analysis of the shock absorbers’ behavior.
For instance, the LAB7 Shock Dyno software provides test results in damper test graphs that allow you to review data effortlessly. Consequently, engineers can use the collected data to examine the shock absorber’s performance under different conditions.
Different Models of LABA7 Damper Test Benches
At LABA7, we have different models of damper test dynos carrying their individual technical specs. Below, we will briefly introduce you to each type, naming their key technical features and presenting you with a visualization of them.
We provide visualizations of both available gadgets and indicated the fundamental parts they include.
An overview of LABA7 Featherlight and Light models
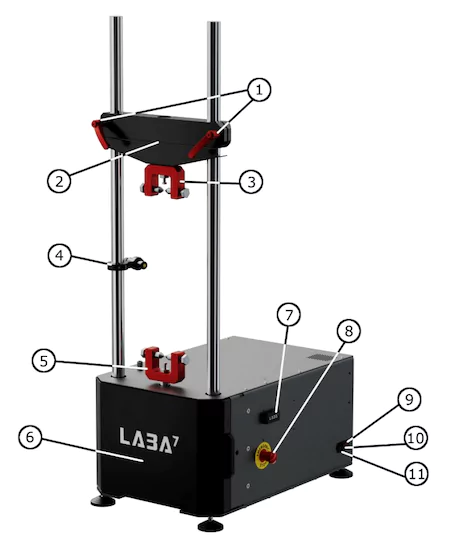
- Crossbar handles.
- Preload crossbar.
- Top mounting bracket.
- Temperature sensor.
- Bottom mounting bracket.
- Safety cover.
- USB connector.
- Emergency stop button.
- Power switch.
- Fuse.
- Power cable connector.
An overview of LABA7 MID and Heavy models

- Crossbar handles.
- Preload crossbar.
- Top mounting bracket.
- Temperature sensor.
- Bottom mounting bracket.
- Safety covers.
- Manual Dyno controller.
- USB connector.
- Emergency stop button.
- Power switch.
- Power cable.
Step-by-Step Guide to Using the Machine
Assessing your dampers properly before stepping into real-world testing can help you save both time and money. To get the most accurate shock performance data, it’s crucial for you to learn how to properly set up and use the dyno.
Here, we will walk you through the key stages of using a LABA7 damper testing equipment:
Mounting the right adapter
Each ordered LABA7 damper dyno comes with a universal and durable adapter. However, for different projects, we recommend using different adapters that fit the tested dampers.
To find out how to replace an existing adapter or mount a new one, see the steps provided below:
- Ensure the dyno is powered off or push the Emergency Stop button.
- Using a wrench tool, unscrew both vertical bolts to release the clamp heads.
- Switch to another adapter and use the same method to secure the bolts in place.
- Release the Emergency Stop button by slightly turning clockwise if previously engaged.
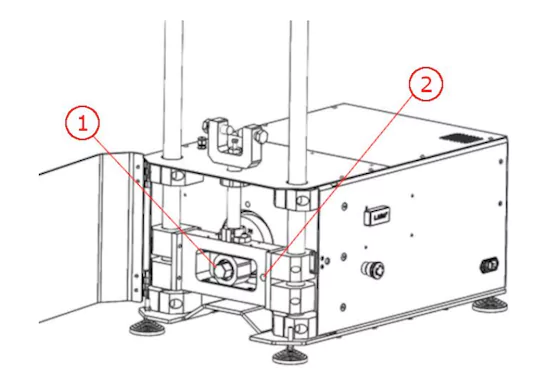
Changing the stroke
Dampers are differently sized and they have various usage cases. Hence, you will need to change the stroke accordingly, so the shock absorber you are testing will not get ruined.
The below-provided steps for changing the stroke can be applied to every LABA7 dyno.
- Hit the Emergency Stop button to halt the dyno operation and prevent any further movement of the motor.
- Rotate the roller bolt using a wrench (Figure 1) and insert the locking pin to lock the roller in place (Figure 2).
- Unscrew the rolling bolt until it is loose.
- Slide the roller to the side to mount it into a different hole on the flywheel.
- Tighten the bolt and remove the locking pin to complete the stroke adjustment.
- Release the Emergency Stop button.
Launching LABA7 Damper Test Bench
Now that you’ve mounted the correct adapter and selected a suitable stroke for your shock that’s being tested, it’s time to learn how to launch the dynamometer for the first time.
- Plug the power cable into the power connector and then plug it into the wall socket.
- Rotate a power switch of a dyno to light up the toggle or the manual dyno controller.
- Press the Emergency Stop button to disable the dyno before mounting the damper.
- Open the safety doors by pulling from the cover side handle.
- Place the damper within the top or bottom adapter and secure it.
- Adjust the handlebars of the preload crossbar to align the damper with the unsecured adapter. Then, lower or raise it to secure it in place.
- Before tightening the preload crossbar, ensure the motor is in a bottom position (use a socket or spanner wrench to adjust the motor so it is placed bottom-wise during the start of rotation).
- Preload the crossbar by pushing it downwards and tightening the handlebars.
- Release the Emergency Stop button.
- Turn off the test bench to configure the software.
Note that if the shortening of a ground leakage circuit breaker occurs while turning off the dyno, then you would need to remove the RFI jumper, which will be explained below.
Setting up the software
Before setting up the software for your new LABA7 shock tester, it’s important to pay attention to the minimum system requirements for the app to function.
| Software: | Windows 7 (SP1), 8, 10, 11 |
| NET Framework: | 4.7.2 |
| RAM: | 4 GB |
| Free disk space: | 1 GB |
Even though our current software version is dedicated to Windows devices, some of our customers found that by using an emulator, you can also use the app on macOS. Soon, we will assess the method and compile a detailed guide for this.
Another thing to note is that you will need to contact the LABA7 customer support team to receive the latest software version. If you have already done that, then let’s dive into the guide on how to set up the software below:
- Open the Software folder and run the installation.
- Launch the application once it is installed.
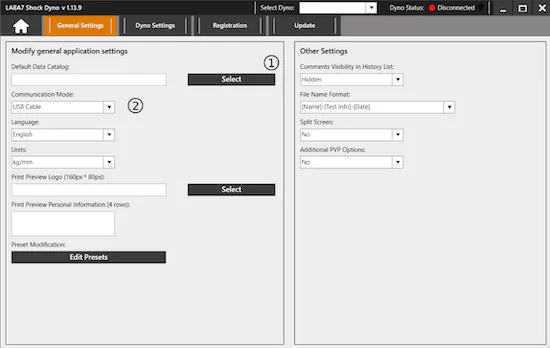
- Head to the Settings page and find the Default Data Catalog through the Select button (Figure 1.)
- Choose Communication Mode by clicking on the drop-down menu (Figure 2.)
- Navigate to the Dyno Settings tab and add a new shock tester model by tapping the Add button.
Starting a New Project
With each newly installed damper, it is recommended to start a New Project. Once you select the New Project option, a calibration tab will show up, asking you to fill in the following information to continue with further steps:
- Project Name – The project’s designated name that will be linked to all the tests conducted within its scope.
- Default Data Catalog – This is where your project files will be initially saved. However, by clicking the Edit icon, this location can be changed.
- No Subfolder – When selected, no subfolder will be generated for the project, and all tests will be stored within the chosen data catalog.
- Spring Force Elimination – When selected, it enables the removal of the spring effect from the dyno graphs.
- Gas Pressure Elimination – When selected, it enables the elimination of the gas pressure from the dyno graphs.
- Calibrate – Press the Calibrate button to perform the initial calibration of the damper.
- Stroke – A read-only field field showcasing the current stroke configured in the Dyno following a successful calibration.
- Shock Temperature – A non-editable field presenting the recorded temperature of the damper following a successful calibration.
- Comments – Enter comments that apply to all tests within the scope.
- Continue Last Project – If selected, it permits entering the testing area without requiring a fresh calibration, assuming one has been conducted before.
Equipment Calibration Process
Once you are about to start a new project with the dyno, there are three types of calibration to go with, including:
- Regular – In this calibration process, a dyno undergoes a series of slow rotations to calculate and retrieve essential data, which evaluates the actual stroke that is set in a damper tester, as well as zero tare to measure the initial force and weight of the damper to exclude it from the damper dyno graphs. Finally, regular calibration allows you to find out the temperature of a damper.
- Gas pressure elimination – If you select the Gas pressure elimination option, the same data will be measured just like during a regular calibration. However, two additional factors will be assessed, including the gas pressure when the damper is in extended and compressed positions.
- Spring force elimination – When using this option, you’ll receive the same measured data as with regular calibration. Additionally, you’ll need to input the spring rate to exclude it from the shock tester graphs.
Is it Worth Investing in Suspension Diagnostic Equipment?
Whether it is worth getting a damper dyno depends on your intentions, budget, and other factors. However, there is no doubt that a shock tester offers a list of benefits if you specialize in the field of testing and optimizing dampers. See the main advantages right below:
- Quality assurance. Once the damper is assessed with the help of a dyno, you, as a mechanic, have evidence that can assure the quality if the customer has doubts.
- Shock performance optimization. The data collected from the dyno testing can help you improve shock absorbers for optimal performance in specific situations.
- Damper durability evaluation. Dynos can help simulate real-life scenarios to examine a damper’s durability and reliability through controlled and repeatable testing conditions.
- Shock development. Damper dynos can play a crucial role in developing new and improved dampers, contributing to enhancements in suspension technology.
- Cost savings. Whether you are manufacturing, fixing, or using shock absorbers for motorsports, properly testing them on time can help you save a noticeable amount of money, as you eliminate many factors leading to a damper getting broken.
You also might like these articles: