
Ensuring that the type of spring corresponds to the weight of a vehicle or driver is crucial for maintaining the stability of your vehicle’s movement. This way, the vehicle suspension system will absorb the bumps of the road most effectively.
With the help of a LABA7 automatic spring rate dynamometer, you can ensure optimal spring performance, whether it’s for a car, motorcycle, MTB, or other vehicles. The device allows you to accurately test the exact force evoked by the springs, forks, as well as coils, and then analyze data using a force vs displacement graph.
For an effective kick-off, we will introduce you to the principles of device operation and we will also walk you through how to use a spring dyno. Feel free to check this article on how to measure spring rate for vehicle suspension.
Table of contents:
- What is a spring dynamometer?
- Overview of LABA7 spring dynos
- How to use a spring dynamometer
- Bottom line
What is a spring dynamometer?
A spring dynamometer is a tool that helps you measure the rate of a spring. The device applies a force to the spring, making it compress or extend with the resulting displacement or deformation being measured afterward.
LABA7 spring rate dynos, specifically, can help you test the rate of any type of shock absorber, fork, or air springs, as well as a bump stop, and also gas pressure.
Once the object is assessed, the digital coil spring tester provides data about the spring’s performance. There, you can see the relationship between the applied force and the emerging deformation, which allows you to determine the spring rate. If you’re using a LABA7 tester, you can analyze real-time generated graphs in the LABA7 Spring Dyno software when connected to WiFi.
Overview of LABA7 spring testers
You can choose from two types of LABA7 spring rate testers: the regular spring rate dyno and the mini spring rate dyno. Both tools are fully automatic, which ensures consistent and reliable results. Additionally, they can be used to test the seal drag, during which the force needed to move suspension components is measured.
Overall, your choice depends on your expectations and needs for testing a range of available springs, device compactness, and, naturally, your budget. So, without further ado, let’s delve into each LABA7 spring rater’s technical specifications:
Spring rate dyno
This is a so-called full-sized automatic spring tester that can run tests for any spring of any shock, making it an excellent fit for motorsports enthusiasts, mechanics, engineers, and other professionals.

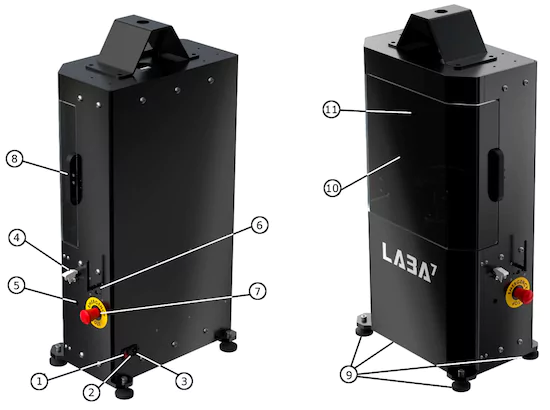
- Power switch.
- Fuse.
- Power cable connector.
- Toggle switch.
- LED Indicator.
- Communication port.
- Emergency stop button.
- Cover handle.
- Adjustable legs.
- Safety cover.
- Mounting adapters.
- Shipping anchors.
You will learn that the parts it contains are similar to the mini tester, however, the technical specs slightly differ:
| Spring rate dyno | |
| Adjustable stroke | 0-300mm |
| Maximum allowed force | 10000N |
| Free rear spring length | 374mm (customizable) |
| Free front spring length | 564mm (customizable) |
| Shock dyno system type | 642x1904x570 |
| Weight | 200 kg |
| Price | 3800€ |
Mini spring rate dyno
Although appearing similar to a standard-size spring dyno, the mini automatic coil spring tester has slightly less versatility in testing various objects. This is attributed to its weaker suspension, resulting from a smaller insert tube.
Nevertheless, even extreme sports enthusiasts will benefit from it, as it perfectly fits in vans or trucks and can be used for extra cases on the way while your workshops are far away.
- Power switch.
- Fuse.
- Power cable connector.
- Toggle switch.
- LED Indicator.
- Communication port.
- Emergency stop button.
- Cover handle.
- Adjustable legs.
- Safety cover.
- Mounting adapters.
Below, you can find the technical specs of the mini coil spring tester:
| The mini spring rate dyno | |
| Adjustable stroke | 0-150mm |
| Maximum allowed force | 10000N |
| Free rear spring length | 305mm (customizable) |
| Free front spring length | 430mm (customizable) |
| Shock dyno system type | 505×957×310 |
| Weight | ~70kg |
| Price | 3000€ |
How to use a spring dynamometer
Whether it’s a coil spring or a shock absorber spring, ensuring they perform consistently and reliably is essential in daily life, leisure, or professional rides. Thus, mastering the setup and usage of your dyno is a critical step in ensuring top-notch spring performance. In case you’re still considering what spring rate tester to get, take a look at our fully automatic LABA7 spring dynos.
For extensive guidance in setting up the dyno, you can download our regularly updated manual. Meanwhile, in this guide, you will find the main setup stages that work for a regular LABA7 spring rate dyno and the mini tester.
Installing the right adapter
Both LABA7 spring rate testers and shock dynos come with universal adapters. However, you may also buy dedicated in-house built adapters for motorcycle or bicycle forks, as well as a self-preload clevis for shocks with a gas expansion tank or standard U-shape clamps for shocks.
When the time comes to mount the right adapter into a spring dyno, you should bear in mind these steps:
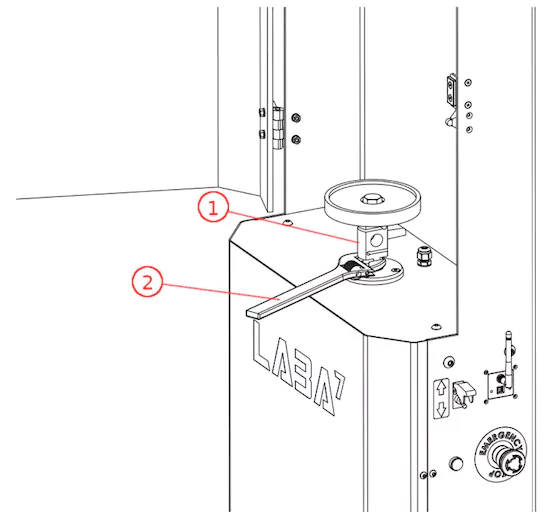
- Hold the load cell in place when replacing a bottom adapter (Figure 1).
- Keep the load cell in place using a wrench and unscrew the adapter (Figure 2.)
- Screw your preferred adapter while keeping the load cell in place.
Launching LABA7 automatic spring dyno
The first launch of a spring tester is what follows after mounting the adapter that fits your tested spring. Follow the steps below to find out how to start up the dyno for the first time:
- Connect the supplied power cable to the device’s power connector and then plug it into the electrical outlet.
- Connect the WiFi antenna.
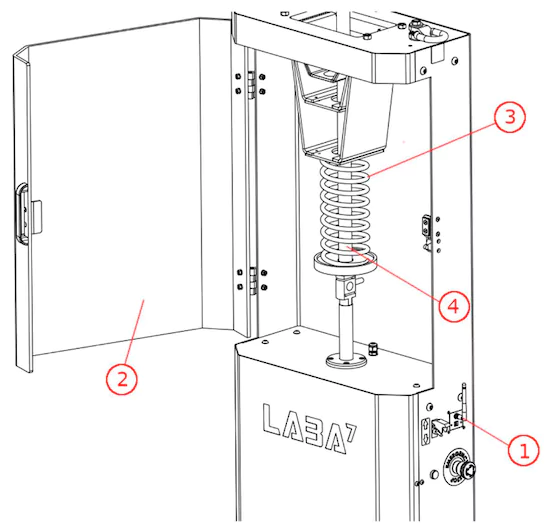
- Turn the dyno power switch on to see a green light up.4. Open the safety lid (Figure 2.)
- Press the red Stop button to disengage the dyno before mounting the springs.
- Place the spring (Figure 3) on the mounting platform vertically.
- Place the insert tube inside the spring (Figure 4.)
- Use the preload switch to adjust the spring accurately, ensuring a snug fit and securing it to eliminate any potential free movement.
- Release the red Stop button and close the lid.
- Begin testing.
LABA7 Spring Rate Tester software setup
Before we dive into the steps for setting up the software, let’s take a look at the minimum system requirements so the program can run properly:
| Software: | Windows 7 (SP1), 8, 10, 11 |
| NET Framework: | 4.7.2 |
| RAM: | 4 GB |
| Free disk space: | 1 GB |
If you don’t have a Windows device, you can also use the emulator to run the LABA7 Spring Rate Dyno software on macOS computers. In case any questions arise, feel free to contact our customer support.
Next, reach out to the LABA7 team to receive the latest version of the Spring Rate Dyno software. Once you’ve confirmed that your device is compatible with the application and have downloaded it, follow the steps below:
- Open the Spring Rate Dyno software folder and install the program.
- Launch the application once it is installed and navigate to the Settings.
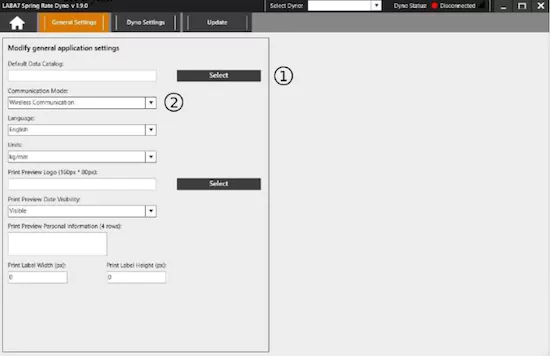
- Choose the Default Data Catalog by clicking on the Select button (Figure 1) in the General Settings section.
- Click the drop-down menu and select Communication Mode (Figure 2.) It can be wireless communication or through a USB cable.
- Head to the Dyno Settings tab and add a new coil tester model by tapping the Add button.
Starting a new project
Whenever you’re about to test a new object, it’s best to start a new project in your LABA7 Spring Rate Tester application. These are the key parameters that you will be able to adjust on the test panel:
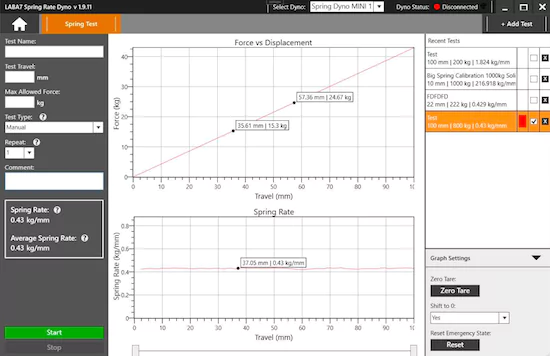
- Test Name. The title of your project.
- Test Travel. This refers to the preferred length of travel for the spring during a test run.
- Max Allowed Force. Sets a hard cap threshold for the maximum force permissible during an ongoing test.
- Test type. Allows the switching between three different test types (manual, automatic, and stretch/reverse.)
- Repeat. A custom number of times a test can be repeated.
- Comment. Enables input of comments or work notes.
Is it worth getting a spring dyno?
Deciding whether to invest in a spring rate tester depends on your specific needs and goals. However, we’ve outlined the main advantages of a spring dynamometer that can assist you in making an informed decision:
- Precise spring rate. With the help of a spring rate tester, you can measure the accurate force created by the springs, coils, and forks. Thus, it will be easier to choose the correct spring based on the weight of a vehicle or a driver.
- The force measurements for individual bearings. By using the LABA7 spring dyno you can measure the force differences of individual bearings, allowing you to choose seals that create the least friction and enhancing the efficiency of your suspension system.
- Air springs measurement. The LABA7 spring tester can help you measure the actual force created by MTB or motorcycle forks air springs.
- Quality guarantee. Whether you’re a mechanic or a suspension system developer, using the coil spring dyno allows you to ensure the quality of your repaired or manufactured springs continuously.
- Prevention from unexpected costs. Using a spring rate dyno helps you ensure the required suspension system performance and prevent technical issues, which may lead to unexpected financial spending.
You also might like these articles: