
Removing air bubbles from the shock absorber fluid is crucial for optimal suspension performance. Proper fluid maintenance guarantees a high vacuum density and a quality oil fill.
If you are upgrading your workshop, explore our professional shock vacuum bleed pump models. In this guide, we will introduce you to this technology and show you how to safely operate these servicing systems.
Table of contents:
- What is a Vacuum-Assisted Oil Servicing System?
- Overview of LABA7 Damper Maintenance Units
- Step-by-Step Operation Guide
- Is it Worth Investing in Professional Fluid Maintenance Equipment?
- Bottom line
What is a Vacuum-Assisted Oil Servicing System?
A shock vacuum-assisted oil servicing system is one of the most essential tools for shocks that optimizes the process of maintaining and enhancing the performance of dampers and forks in various vehicles such as cars, trucks, or bicycles. This device helps in filling shock absorbers while ensuring that there are no bubbles of air left in the oil chamber.
During the automated maintenance process, the machine creates a vacuum inside the shock absorber and starts to fill in the suspension oil while eliminating any trapped air that comes from a bottle of fluids you’ve used. The bubble-free oil fluid is crucial for foaming prevention and retaining consistent suspension system performance in the long run. Meaning, you can avoid such issues as suspension sagging.
At LABA7, we have four different damper maintenance units for shocks and forks – it’s the MANUAL, MODULE, DAILY, and PRO models. The core set of features is the same from device to device; however, they’ve been designed to fit different needs. When developing them, we aimed to build a technology that could create a deeper vacuum in order to eliminate trapped air from the oil most efficiently.
Overview of LABA7 Damper Maintenance Units
Each LABA7 vacuum-assisted oil servicing system is fully automated, ensuring you can bleed dampers or forks using safety-friendly vacuum levels, which is virtually impossible when servicing dampers without vacuum treatment. Nevertheless, each of our pumps has been developed for different use cases, differentiating in certain technical aspects.
If you haven’t decided what device you need yet, continue reading to learn more about LABA7 damper maintenance units and make an informative decision:
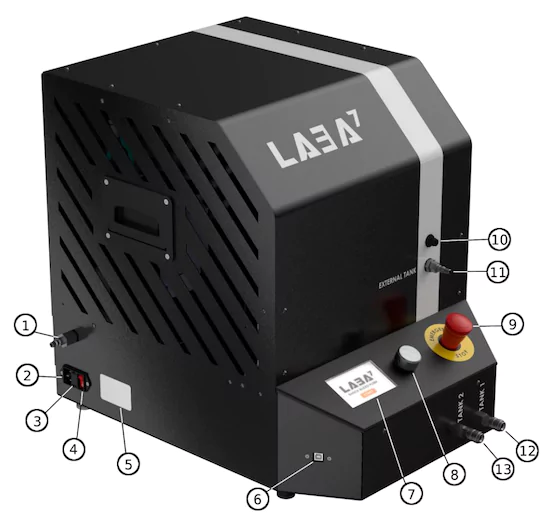
LABA7 MODULE Automated Damper Maintenance Unit
The LABA7 MODULE is the most compact option on the list. It makes a perfect fit for trucks or vans that are always on the move and need to refill their shock absorbers on the way.

- Compressed air connector.
- Power cable connector.
- Fuse.
- Power switch.
- Label.
- USB connector.
- External tank 1 hose connector.
- External tank 2 hose connector.
- External tank 1 cable connector.
- External tank 2 cable connector.
- Emergency stop button.
- 4.3″ LCD display.
- Main control button.
And these are the technical specifications for the MODULE damper maintenance unit:
| MODULE Servicing Unit | |
| Fully automatic | Yes |
| 8 custom presets | Yes |
| Internal tanks | No |
| Works with external tanks | Yes |
| Two filling modes | Bladder shock and separating piston |
| Adjustable pressure | 0.5 – 4 BAR |
| Adjustable vacuum | -0.3 – -0.99 BAR |
| Dimensions | 260 x 271 x 343 mm |
| Price | 2500 € |
It’s important to note that the MODULE option doesn’t have internal tanks; therefore, you’d need to get an external tank, about which we will talk below.
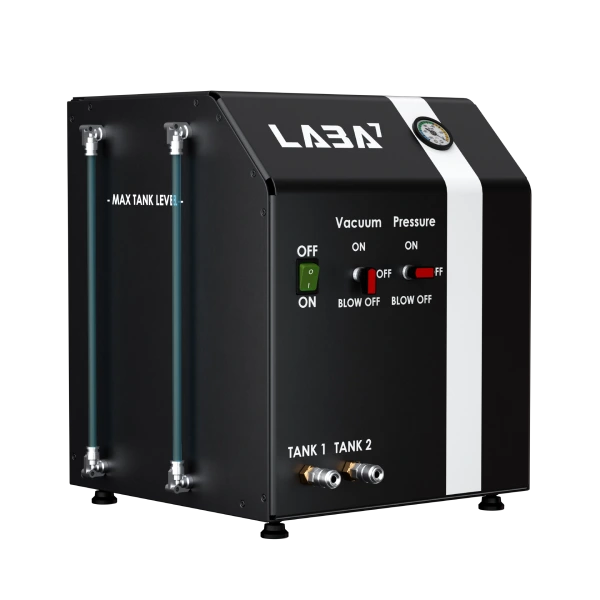
LABA7 DAILY Automated Damper Maintenance Unit
The LABA7 DAILY speaks for itself – it’s the middle option between the MODULE and PRO models, which can benefit any vehicle service business. The device is capable of filling two dampers simultaneously; therefore, you will be able to complete the work in no time.

- Compressed air connector.
- Power cable connector.
- Fuse.
- Power switch.
- Label.
- USB connector.
- 4.3″ LCD display.
- Tank 2 connector.
- Tank 1 connector.
- Main control button.
- Emergency stop button.
And these are the technical specifications for the DAILY damper maintenance unit:
| DAILY Servicing Unit | |
| Fully automatic | Yes |
| 8 custom presets | Yes |
| Internal tanks | Yes, two |
| Works with external tanks | No |
| Two filling modes | Bladder shock and separating piston |
| Adjustable pressure | 0.5 – 3 BAR |
| Adjustable vacuum | -0.3 – -0.99 BAR |
| Dimensions | 333 x 497 x 478 mm |
| Price | 2950 € |
LABA7 PRO Automated Damper Maintenance Unit
The LABA7 PRO is the most advanced option for any vehicle professional. With an external tank connected, it can fill up to even three dampers at a time.
- Compressed air connector.
- Power cable connector.
- Fuse.
- Power switch.
- Label.
- USB connector.
- 4.3″ LCD display.
- Main control button.
- Emergency stop button.
- External tank cable connector.
- External tank hose connector.
- Internal tank 1 connector.
- Internal tank 2 connector.
And these are the technical specifications for the PRO damper maintenance unit:
| PRO Servicing Unit | |
| Fully automatic | Yes |
| 8 custom presets | Yes |
| Internal tanks | Yes, two |
| Works with external tanks | Yes, optional |
| Two filling modes | Bladder shock and separating piston |
| Adjustable pressure | 0.5 – 4 BAR |
| Adjustable vacuum | -0.3 – -0.99 BAR |
| Dimensions | 411 x 497 x 551 mm |
| Price | 4000 € |
LABA7 MANUAL Damper Maintenance Unit
The LABA7 MANUAL is the entry-level option for workshops and enthusiasts seeking reliable shock bleeding without electronic complexity. It can fill up to two dampers at a time using precision valves and gauges.
- Compressed air connector.
- Power switch.
- Fuse.
- Power cable connector.
- Tank 2 connector.
- Tank 1 connector.
- Pressure control knob.
- Vacuum control knob.
- Vacuum switch.
- Vacuum / pressure gauge.
- Tank 1 oil level indicator.
- Tank 2 oil level indicator.
And these are the technical specifications for the MANUAL damper maintenance unit:
| MANUAL Servicing Unit | |
| Fully automatic | No |
| Custom presets | No |
| Internal tanks | Yes, two 2-liter |
| Works with external tanks | No |
| Filling modes | Standard |
| Adjustable pressure | 0.5 – 3 BAR |
| Adjustable vacuum | Up to -0.99 BAR |
| Dimensions | 390 x 360 x 400 mm |
| Price | 1800 € |
Manual Servicing Unit technical specifications
External Fluid Tanks
An external tank comes in handy when you’re using the MODULE or PRO damper maintenance units, as well as if you must work with several different types of oil at once, as an external tank allows you to do it without needing to clear out the tank.
You can choose between two sizes of LABA7 external tanks, with either a 3L (287 x 577 x 284 mm) or a 6L tank (225 x 537 x 250 mm):
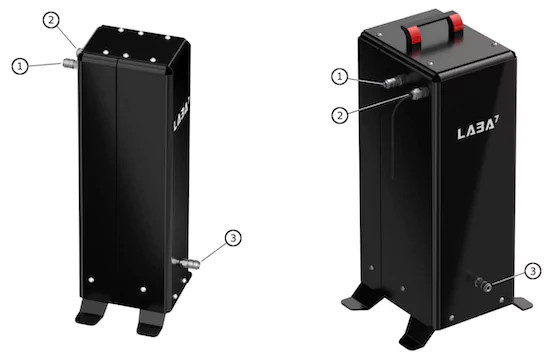
- Hose connector.
- Cable.
- Filling connector.
Step-by-Step Operation Guide
Whether you’ve already purchased a dedicated vacuum system or are still considering doing that, learning how to use it properly is essential for ensuring optimal results and keeping your shock absorbers well-maintained.
Below, you will find a constructive guide on how to use a system, the steps apply no matter if it’s the LABA7 MODULE, DAILY, or PRO model. For more extensive guidance, make sure to download a dedicated manual.
Before You Start: Air Supply & Power Requirements
Before you begin using your LABA7 damper maintenance unit, it’s essential to ensure that your workspace meets the necessary air supply and electrical power requirements. Proper setup from the start will guarantee optimal performance and prevent potential damage to your equipment.
Air Compressor Requirements
All models require air quality that meets ISO 8573 standards. This international standard ensures your compressed air is free from contaminants such as water vapor, oil, and particulate matter that could interfere with the air/bubble removal process or damage internal components.
Why Air Quality Matters
Using compressed air that doesn’t meet ISO 8573 standards can lead to moisture contamination in your shock oil, reduced vacuum efficiency, and premature wear on pump components. Invest in proper air filtration and ensure your compressor delivers clean, dry air.
Electrical Power Setup
Verify that your electrical outlet matches the voltage requirements specified on your device’s label. Each pump comes with a dedicated power cable designed for safe operation. Always use the included cable and ensure your power source provides a stable electrical supply to prevent interruptions during the bleeding process.
Launching the Equipment
If you have verified that the power supply matches the device’s requirements and have everything else set, continue reading and find the steps for launching LABA7 bleed machines for the first time:
- Connect an air compressor air hose to the compressed air connector.
- Connect the included power cable to the device’s power connector and plug it into the electrical outlet.
- Turn the unit’s power switch on for the green light to enlighten.
- Wait for 2 seconds for the pump to initialize.
- Press “OK” to start.
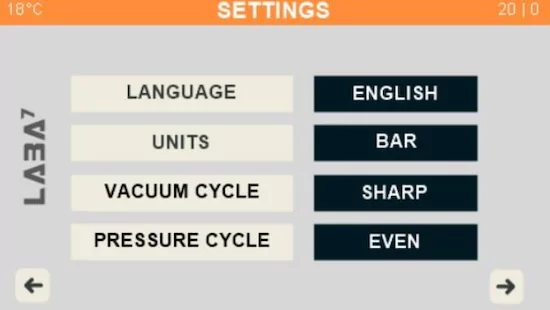
Configuring the System Settings
After you have launched your professional fluid maintenance equipment for the first time, it’s time to configure it. You will see all the settings options on the LCD screen on the unit and manage them using the main control button.
Continue with the steps below:
- Scroll to the SETTINGS option and press OK.
- Select one of the setting options by clicking OK to enter the Edit mode.
- Rotate the main button to change the selection and press OK to save the modification.
- Move to the NEXT button and click OK to enter the second page of the SETTINGS menu.
- Repeat step 3 for modifying a selected setting.
- Move to the following settings page and choose one of the eight templates
- Click OK to edit the selected template.
Fluid Bleeding and Filling
LABA7’s bleed machines are compatible with both bladder shocks and shocks with separating pistons. If you are using professional fluid maintenance equipment for the first time, we suggest using the automatic mode to bleed and fill your shock. This will help you avoid human error and achieve desired results effortlessly.
Below, we will guide you through how to bleed and fill both types of shocks using an automatic mode.
Bladder shock:
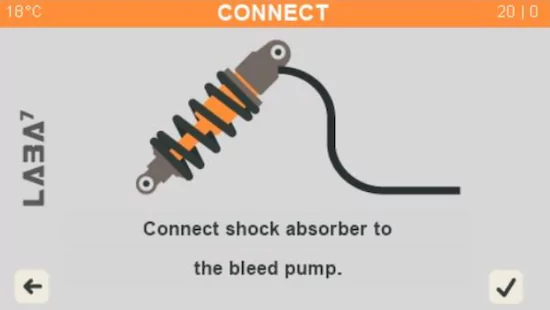
- Connect the hose to the pump connectors of the TANK 1 and/or TANK 2.
- Attach the necessary shock bleed connector to the opposite end of the hose.
- Select the BLEED SHOCK option from the main window.
- Select the BLADDER SHOCK option from the BLEED menu.
- Choose the AUTOMATIC BLEED option from the INTERVALS menu.
- Connect the shock absorber to the bleed connector that is attached to the hose.
- Ensure that the shock being bled is positioned below the External Tank, with the bleed port oriented upward.
- Select the confirmation icon to start the bleed process.
- Allow the shock absorber to fill automatically, or stop the filling process at any point by pressing the back button and choosing the confirmation icon.
Shock with a separating piston:
- Connect the hose to the pump connectors of the TANK 1 and/or TANK 2.
- Connect the necessary shock bleed connector to the opposite end of the hose.
- Choose the BLEED SHOCK option from the main window.
- Select the SEPARATING PISTON option from the BLEED menu.
- Select the AUTOMATIC BLEED option from the INTERVALS menu.
- Connect the shock absorber to the bleed connector that is attached to the hose.
- Make sure that the shock being bled is placed below the External Tank, with the bleed port positioned upward.
- Choose the confirmation icon to start the bleed process.
- Wait for the shock absorber to complete filling, or halt the filling operation at any moment by pressing the back button and choosing the confirmation icon.
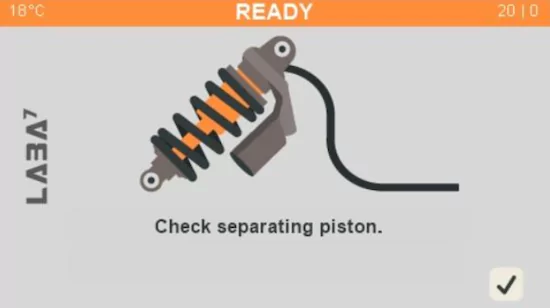
Bear in mind to open all external adjusters on the shock absorber, push the separating piston to the bottom, and install the circlip (fastener) to prevent the free piston from shooting out when filling.
Safety & Best Practices
Proper preparation of your shock absorber is critical for safe and effective bleeding. Follow these essential steps before starting the process.
Prepare External Adjusters
Always open all external adjusters on the shock absorber before beginning. This prevents dangerous pressure buildup inside the shock during the bleeding and filling process, ensuring fluid can flow freely without resistance.
Secure the Separating Piston
For shocks equipped with separating pistons, push the piston all the way to the bottom of its travel before connecting to the unit. This creates proper clearance for oil filling and prevents air pockets from forming.
Install the Circlip (Critical Safety Step)
After positioning the separating piston at the bottom, install the circlip (fastener) securely. This small component is essential—it prevents the free piston from violently shooting out under pressure during the filling operation, which could cause serious injury or equipment damage. Never skip this step.
Additional Safety Reminders
Position the shock below the external tank with the bleed port facing upward. Wear safety glasses and gloves when handling suspension oils. Inspect all hose connections before starting, and keep the emergency stop button within easy reach throughout the operation.
Is it Worth Investing in Professional Fluid Maintenance Equipment?
When questioning whether getting a damper maintenance unit is worth it, it’s always important to evaluate your intentions and determination to maintain the quality of the suspension systems you work with.
Benefits:
- Efficient gas removal from the oil chamber. Each new bottle of suspension oil can average around 10% gas dissolved in the liquid. With the help of a professional fluid maintenance equipment, you can securely reduce the amount of gas in the damper to a minimum.
- Security-friendly vacuum pressure adjustment. By using a professional vacuum system, you can adjust the pressure of a vacuum, which allows you to bleed vacuum-sensitive suspension system parts risk-free.
- Enhanced vehicle performance. Using our dedicated vacuum systems for shock absorbers ensures perfect vacuum and pressure levels that in turn reduce the chances of aeration and cavitation effects forming.
- Possibility to serve several shocks simultaneously. With LABA7 vacuum system components, you can bleed and fill several dampers at a time. Hence, you will not only save time but also boost your income.
- User-friendly experience. Bleeding and filling shock absorbers or forks manually requires technical knowledge and can be challenging for beginners. The LABA7 damper maintenance unit are fully automatic, making it a great option for users with no prior experience.
Bottom Line
Mastering the use of a vacuum-assisted damper maintenance unit is essential for maintaining optimal shock absorber performance and extending the life of your suspension systems. Whether you choose the compact MODULE, the versatile DAILY, the advanced PRO model, or the entry-level MANUAL, LABA7 machines simplify what was once a technically challenging process.
Take the time to familiarize yourself with your specific model’s features, practice the procedures outlined in this guide, and always prioritize safety. The result will be perfectly bled shock absorbers that deliver the smooth, controlled performance your customers expect.
FAQ About LABA7 Damper Maintenance Units
Do I need an external tank with every LABA7 pump?
No. The DAILY model comes with two internal tanks and doesn’t support external tanks. The MODULE requires external tanks as it has no internal tanks. The PRO includes two internal tanks but can optionally connect to external tanks for filling up to three dampers simultaneously.
What vacuum/pressure ranges do LABA7 pumps support?
All LABA7 professional fluid maintenance equipment support adjustable pressure from 0.5 to 5 BAR and adjustable vacuum from -0.3 to -0.99 BAR. These ranges ensure safe, controlled bleeding for various shock absorber types.
Can LABA7 bleed both bladder and separating piston shocks automatically?
Yes. All LABA7 models (MODULE, DAILY, and PRO) feature automatic bleeding modes for both bladder shocks and shocks with separating pistons, making the process effortless and error-free.
What air supply do I need for stable operation?
The MODULE and PRO require a minimum of 5 bar pressure rating, while the DAILY needs at least 3 bar. All models require compressed air quality that meets ISO 8573 standards to ensure clean, dry air free from contaminants.
You also might like these articles:
- Finding the best shock dyno for sale
- How to use a spring dyno
- How to use racing scales
- How to use a shock dyno
- The Ultimate Guide to Suspension Vacuum Pumps: Everything You Need to Know
- How to Bleed Shocks: A Manual vs Automatic Showdown
- Testing shock absorbers after Manual vs Automatic damper bleeding