
How to test shock absorbers using a LABA7 shock dyno? It’s simple. The process is designed to be clear, intuitive, and ergonomic – whether it’s your first test or your hundredth.
Table of Contents
- What You’ll Need (Adapters, Wi-Fi/USB, Shock Details)
- Select Test Stroke (Travel)
- Mount the Shock: Use the Correct Dyno Adapters
- Power Up & Connect the Dyno
- Configure & Run Shock Absorber Test
- Read the Graphs (Force-displacement, Force-velocity, PVP)
- Compare Runs & Settings (Color-coded Overlays)
- Export & Share Results (PDF/CSV)
- Safety & Troubleshooting (Common Mistakes, Quick Fixes)
- Conclusion on Shock Absorber Testing
What You’ll Need (Adapters, Wi-Fi/USB, Shock Details)
Before you begin testing, gather the following items to ensure a smooth workflow:
Hardware & Adapters
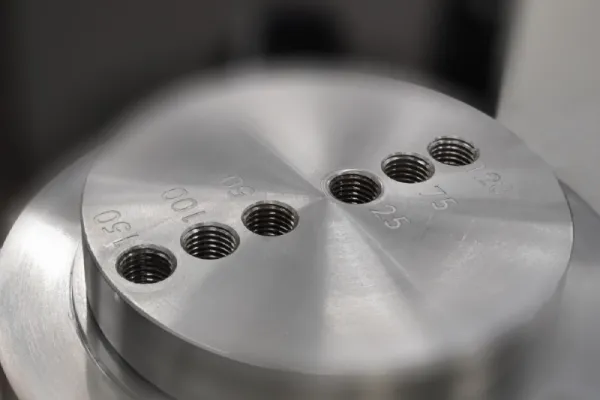
- Appropriate shock dyno adapters for your specific shock absorber (top and bottom mounts)
- LABA7 shock dyno (Scotch-Yoke or electromagnetic system)
- Computer or laptop with LABA7 Shock Dyno Software installed
Connectivity
- Wi-Fi connection or USB cable to connect the dyno to your computer
- Stable power supply for the dyno
Shock Information (Optional but Recommended)
Having these details ready will help you organize your test data:
- Shock manufacturer and model
- Year of manufacture
- Piston size and specifications
- Oil type and viscosity used
- Any custom settings or modifications
Select Test Stroke (Travel)
First, determine the stroke you’ll need. On the cranks of LABA7 Scotch-Yoke shock dynos, we engraved the full travel length – that’s how far the shock will be compressed and extended during the test. Choosing the right stroke will prevent damaging it. On electromagnetic damper test systems this step is not mandatory as EMA can replicate any stroke.
Mount the Shock: Use the Correct Dyno Adapters
Next, mount the shock. Use the right shock dyno adapters for the damper. Tighten the top handles while the shock is nearly fully extended and the dyno is at the bottom, dead center. Everything should feel stable and secure to safely test the shock absorber.

Power Up & Connect the Dyno
To begin testing with your LABA7 Shock Dyno, first connect the dyno to your computer and open the LABA7 Shock Dyno Software. From here, you can start a new project. And the next step is to calibrate the dyno.
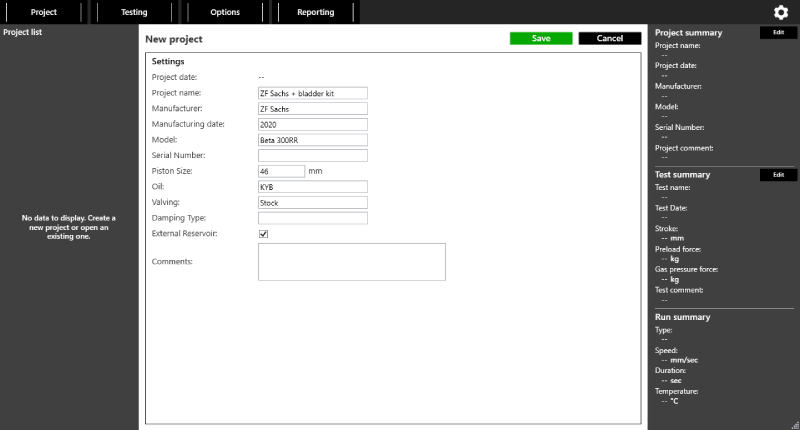
Start a New Project in LABA7 Software
With the dyno connected, click to start a new project in the LABA7 Shock Dyno Software. This is where you’ll organize and document your test data.
Add relevant details about the shock absorber you’re testing: manufacturer name, model, year of manufacture, piston size, oil type and viscosity, and any custom modifications or settings. While these details are optional, they’re invaluable for keeping organized records and tracking performance changes over time.
You can also add notes about the test conditions, customer information, or any specific issues you’re investigating. This documentation becomes especially useful when comparing multiple tests or troubleshooting performance issues.
Calibrate the Dyno (One-Click Auto-Cal)
Calibration comes next – and here’s the best part: it’s fully automated. Simply click the “Calibrate” button and the dyno handles everything automatically. No manual adjustments. No extra tools. No technical expertise required.
The auto-calibration process takes just moments and ensures accurate, reliable test results every time. The software guides the dyno through its calibration routine, verifying sensor accuracy and establishing baseline measurements. Once complete, you’ll receive confirmation that the dyno is calibrated and ready to test.
Configure & Run Shock Absorber Test
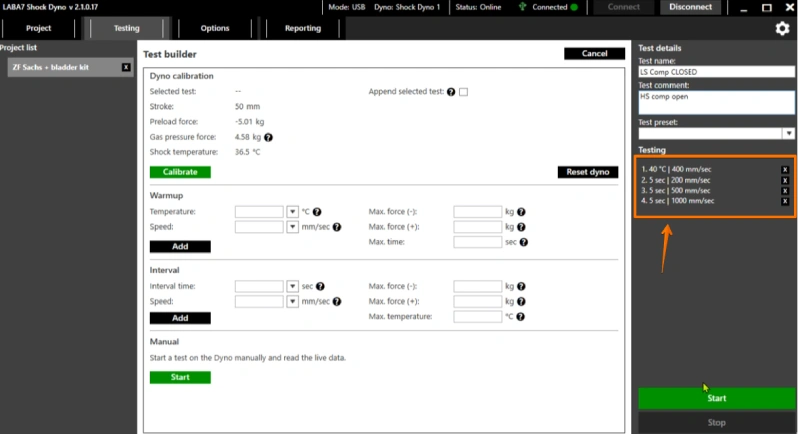
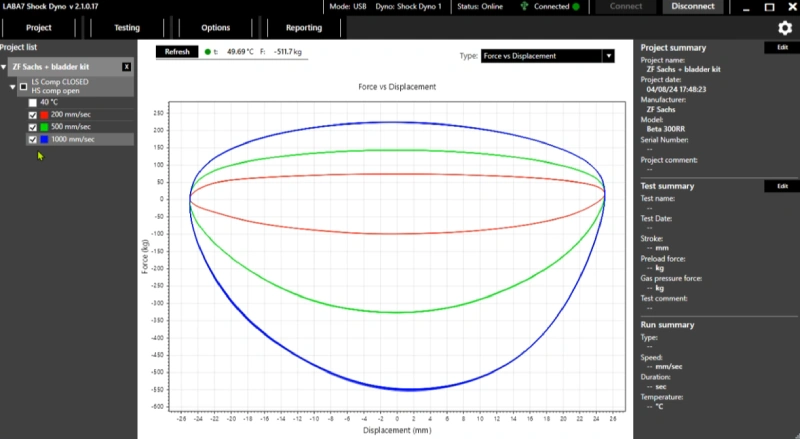
Now define the test. In this case, it’s a dirt bike shock. We’ll test it at three speeds: 200 mm/s, 500 mm/s, and 1000 mm/s. These represent low, mid, and high-speed compression. Just select the test profiles and press start. The dyno will run each one automatically.
Worried about safety? Don’t be. If the shock fails, the dyno stops the test immediately thanks to built-in safety protocols.
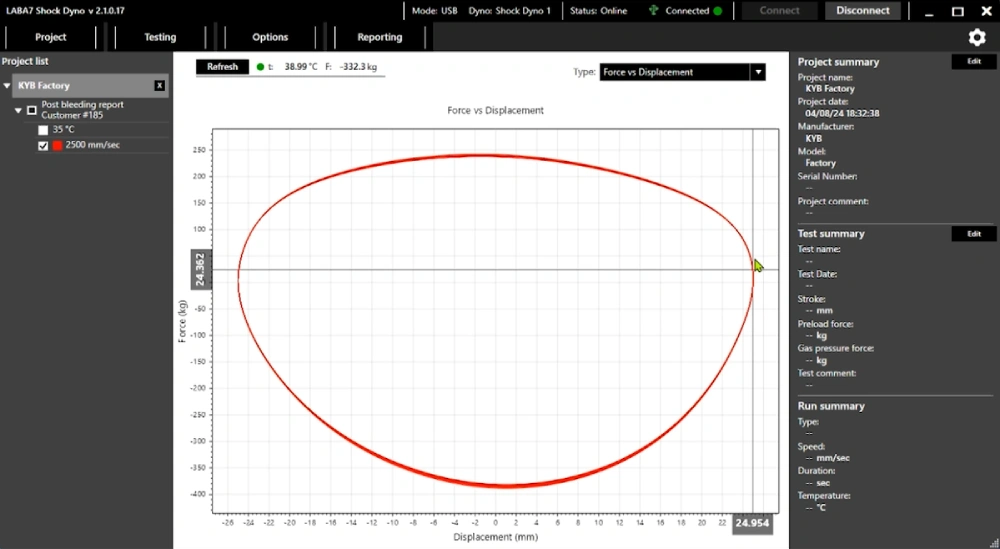
Read the Graphs (Force-displacement, Force-velocity, PVP)
Once the tests are done, the data is ready to view. The software presents it in clear, easy-to-understand graphs. “Force vs. Displacement” is the most common one – and a great place to start.
You can save the results to your computer. You can export them in multiple formats. For this example, a PDF (PVP) makes sharing easy.
Compare Runs & Settings (Color-coded Overlays)
Want to compare changes after an adjustment? Just make changes and test shock absorber again. Tick the boxes of the runs you want to compare. Color-coded lines make it simple to see the difference in damping force.
That’s it.
Export & Share Results (PDF/CSV)
Once you’ve completed your tests and comparisons, it’s time to save and share your data. The LABA7 software offers multiple export options to meet various needs.
For client reports or presentations, export your results as a PDF. This format includes all graphs, test parameters, and shock details in a professional, easy-to-share document. PDF exports are perfect for emailing to customers or printing for physical records.
Do you need to analyze the data further or import it into another software? Export as CSV (comma-separated values). This format provides raw data that can be opened in Excel, Google Sheets, or any other data analysis tool. It’s ideal for creating custom reports, tracking performance trends over time, or conducting advanced analysis.
You can also save the entire project file within the LABA7 software, preserving all test runs, settings, and notes for future reference. This is particularly useful for maintaining a comprehensive database of shock tests and comparing performance across multiple service intervals.
Safety & Troubleshooting (Common Mistakes, Quick Fixes)
The LABA7 shock absorber testing machine includes built-in safety protocols that automatically stop testing if a shock fails or shows signs of malfunction during the test.
However, following proper procedures ensures safety and accurate results.
Common Mistakes to Avoid:
- Mounting the shock while the dyno is not at the bottom dead center – always start at the lowest position
- Using incorrect adapters that don’t fully secure the shock – double-check adapter compatibility before testing
- Selecting a stroke length that exceeds the shock’s travel range – this can damage the shock
- Not tightening the top handles securely while the shock is nearly fully extended
- Running tests without proper calibration – always calibrate before testing
Quick Fixes:
- If the dyno won’t connect, check both power and USB/Wi-Fi connections, then restart the software
- If calibration fails, ensure the shock is properly mounted and the dyno is at bottom dead center, then retry
- If test results seem inconsistent, recalibrate the dyno and verify all mounting points are secure
- If the software doesn’t detect the dyno, check your firewall settings or try switching from Wi-Fi to USB
Conclusion on Shock Absorber Testing
The vehicle shock absorber testing is a fast, straightforward, and repeatable process. No unnecessary steps. No confusion. LABA7 shock dynos are built to be easy to use, even for someone with no prior dyno experience.
It really is that simple!
FAQ About How To Test Shock Absorbers
Do I need to set a specific stroke for every test?
Yes, for Scotch-Yoke dynos, you must select the appropriate stroke length before testing. Check the engraved markings on the cranks to match your shock’s travel range—choosing the wrong stroke can damage the shock. Electromagnetic systems don’t require this step as they can replicate any stroke automatically.
How do I know the shock is mounted correctly?
The shock should be mounted with the dyno at the bottom, dead center, and the shock nearly fully extended. Tighten the top handles firmly and ensure both adapters are secure with no play or movement. Everything should feel stable—if something feels loose or misaligned, stop and remount before testing.
Is the calibration manual? How long does it take?
No, calibration is fully automated. Simply click the “Calibrate” button and the dyno handles everything automatically. The entire process takes just moments—no manual adjustments or special tools required. The software confirms when calibration is complete, and the dyno is ready to test.
Which graphs should I read first, and how do I compare settings?
Start with the “Force vs. Displacement” graph—it’s the most common and easiest to interpret for understanding overall damping performance. To compare settings, simply tick the boxes next to the test runs you want to overlay. Color-coded lines make it easy to spot differences in damping force between runs.